
The 19th century military seat
The 19th century American military seat, which we teach and practice at our trainings, has some similarities to both Western riding and to classical dressage. It is similar to both of these styles in that the rider has a deep seat, long leg (the stirrup leathers are adjusted long so the knee is only slightly bent), and the rider sits the trot rather than posts. The modern “forward” seat had not yet been invented; therefore riders jumped in a classical seat, inclining forward only slightly.
Here is a brief description of the 19th century military seat from the Poinsett Tactics. My comments are in italics:
- The buttocks should be pushed well forward underneath the body and bear equally upon the middle of the saddle. The buttocks should not press against the cantle. [This ensures that the back is not hollow; also see #8 below.]
- The thighs should extend downward and slightly forward. They should rest without constraint upon their flat sides and clasp the horse evenly.
- The knees should be bent but without stiffness, and should clasp the horse snugly.
- The lower legs should extend downward and slightly backward; they should be in contact with the horse, but without contraction [if the lower leg contracts, the heel will be brought higher than the toe, which is incorrect. The trooper will also tend to pivot forward on the knee which puts him in a dangerous and unbalanced position]. When the lower leg is in proper position, the stirrup strap [stirrup leather] should hang vertically.
- The ball of the foot should rest easily on the tread of the stirrup, the heel slightly lower than the toe, the ankle without stiffness.
- If the rider is without stirrups, the feet should hang naturally, toes hanging down; they should be free from stiffness in the ankles.
- The upper part of the body should be easy, free, and erect. [In other words the rider should not slouch! At the same time he should not be stiff as a post either.] The spinal column should be supple, especially in the small of the back. [Having a supple lower back is critical to following the motion of the horse, and especially, sitting the trot. When the lower back becomes stiff the rider begins to bounce out of the saddle and “slap leather” at the trot and canter—which is punishing to the horse as well as the rider.]
- The shoulders should be thrown back evenly but without hollowing or stiffening the back. [This also ensures that the shoulders will not be collapsed and the back will not be hunched. Again, notice the instruction not to hollow the back!]
- The arms should be free, the elbows falling naturally by the side.
- The reins should be held in one or both hands as is necessary [depending on the bit used]
- The head should be erect but without stiffness in the neck.
- The eyes should not be downcast but alert and glancing well to the front. [Don’t look down—especially when approaching a ditch or jump. Instead, look where you want to go.]
There is some debate among cavalry reenactors about the correct position of the lower leg. Some contend that the rider’s feet should be stuck out in front of him, and cite the diagram in the Poinsett Tactics of “Position of the Trooper Mounted” and some period photographs to back up this claim. However, the written instructions in the Poinsett Tactics (reproduced above) clearly contradict this claim. For example, if the feet are pushed forward the stirrup leather will no longer be vertical. Nor will the lower legs “extend downward and slightly backward” as specified in the written instructions. It is important to note that all these pictorial references depict the horse standing still, not in motion. Also, it’s important to bear in mind that some of the historical photographs are of people who were not necessarily skilled riders, were trying to keep the horse still for the photo, or were posing stiffly for the photographer.
One potential problem that modern reenactors may face is that some reproduction saddles have the stirrup bars placed too far forward relative to the deepest part of the saddle. This forces the rider into a “chair seat” and he must consciously work to get the legs far back enough to properly apply leg aids. With a well trained horse the rider can rely more on seat aids and this may be less of an issue. If one is ordering a saddle one may specify that the stirrup bar be placed farther back.
We have not done a detailed analysis of original antique saddles, but we believe that some original saddles had the stirrup bar well forward and did in fact, force the rider into a chair seat. This did not have to be punishing to the horse as long as the rider is relaxed and well balanced, and the legs are not pushed stiffly forward. However it keeps the rider’s legs off the horse and prevents him from using the leg aids effectively. A rider in this type of saddle must rely much more heavily on seat aids, and also must consciously remember to bring the legs back to apply the leg aids. A potential danger of this seat is that is encourages the rider to rely on hands for balance, which will create resistance in the horse.
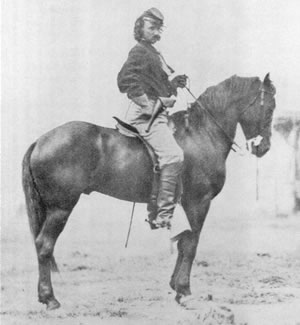
A Proper Military Seat
This famous wartime photo of Custer—a graduate of the West Point equitation program who was considered a superb rider— demonstrates that at least some original saddles (in this case a Jenifer officer’s saddle) had the stirrup bar placed far enough back that the rider could maintain a proper alignment of shoulder, hip and heel. In fact if you erased the horse from the photograph, Custer would land on his feet. Of course he is also posing for the camera. He has exaggerated the raising of the rein hand to get the horse to break at the poll, and with one hand at his waist, his lower back looks more hollow than it should be. But in general his obvious ease and relaxation on the horse, his upright posture, and correct alignment of shoulder, hip and heel, provide an excellent model to emulate.
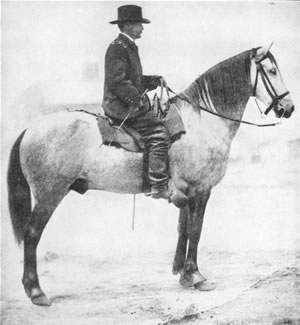
Not Recommended
This photo of General Pleasonton shows him in the “chair seat” that was common among less educated riders of the day. Doubtless he needs the whip for his placid looking gray because he can’t use his legs effectively from this position.
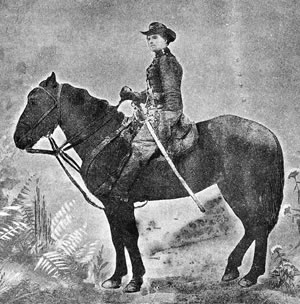
A Poor Seat
Photo of First Massachusetts cavalryman: Just because it’s a wartime photo does not mean that the rider is experienced! Three out of four troopers in the 1st Massachusetts had never ridden a horse before they enlisted. We wouldn’t recommend this riding position to anyone, and the position of the legs is in direct contradiction to the written instructions in Poinsett. It’s also possible that this trooper was simply posing for the camera and may have looked quite different when actually moving.
What bit should I be using?
Unless you are a very experienced rider, we recommend that all recruits start out with a snaffle bit, as 19th century cavalrymen were supposed to do in theory, if not always in practice. For public demonstrations we prefer that you use either a loose ring sweet iron snaffle or a full cheek snaffle, both of which were commonly used on the 19th century. (Loose ring snaffles are a very common dug item on old battlefields.) If you are an officer, you may use a Pelham (one of the most common bits in use by officers of the time) or a double bridle.
Eventually the cavalry troopers graduated from the snaffle to the curb (or in the case of the “Regulars,” and many officers, a military pelham bit, or a bit and bridoon). Enlisted men were issued both a curb bit and a “watering bit,” a loose-ring snaffle which had toggles that fit into loops on the halter, converting it into a bridle. Since cavalrymen had to take horses two water two to three times a day (which might involve 6 to 12 miles of riding) use of the watering bit allowed the horse relief from the heavy curb bit. A good reproduction of a watering bit is available from Border States Leatherworks and can be used as well.
Although enlisted men were issued curb bits, vaquero style “neck reining” using a loose rein was not practiced by the cavalry. The trooper was expected to keep light contact with his horse’s mouth when maneuvering. For more information on reining technique, see “The Practical Use of the Saber for Reenactors and Living Historians” by James Ottevaere.
We do not advocate using a curb bit simply to “look the part” unless you have an independent seat and good hands, which allow you to maintain a soft contact with the horse’s mouth. The curb bit alone is relatively ineffective in turning a horse; the rider must use seat, legs and hands in concert to turn the horse. Therefore the rider must demonstrate a higher level of expertise, and the horse a higher level of training, before being allowed to use a curb bit on the battlefield. Even during the Civil War, many experts felt that the curb bits issued to the troopers were far too harsh for inexperienced hands:
“I do not like the [Army] bridle so well. The bit is ordinarily too powerful for the horse; it is made of poor steel, and the curb-chain is apt to straighten out upon pulling the reins. This could, no doubt, be remedied. I think, however, a decided improvement could be made in the choice of bits.”
--Colonel Albert G. Brackett, 9th Illinois Cavalry, 1865
“Far too many riders are in curbs, for all the wrong reasons, when they should be in snaffles until they learn how to use the hands.”
--Ron Smith, military horsemanship instructor (on the Military Horse website)